When using SyncLinx/AccountLinx, you may encounter situations when you need to use multiple different QuickBooks company files:
- Switching to a brand new QuickBooks company file, such as for the new year.
- You use two different QuickBooks company files to handle separate employees and clients/jobs.
Depending on your needs, there are a couple of things to be mindful of to ensure a smooth transition as QuickBooks will try to automatically connect to whatever QuickBooks company file is open. As this can result in delayed AccountLinx exports if you are not familiar, we will provide numerous prompts to prevent mapping to an incorrect company file.
The information below is intended for a general setup of QuickBooks and AccountLinx and does not take into account unique account setups.
Read Entire Article Prior to Use
Please read the entire article before proceeding with switching between company files to limit any issues that could prevent timely AccountLinx Exports. If you are unfamiliar with switching between company files, we recommend doing this a couple of days prior to any AccountLinx exports to understand the process.
Retain AccountLinx Mappings
Entities in AccountLinx can currently only be mapped to one QuickBooks company file at a time, which will require you to re-map all of your entities before every export when switching between company files normally. To help mitigate how many entities need to be remapped, you can enable the option "Export to multiple QuickBooks companies" to preserve the mappings when switching company files. This will not get around the limitations of entities being mapped to only one QuickBooks company file at a time. This will help in situations where your entities do not overlap so you do not need to remap them as often.
- Go to Tools, click Exporter Settings, and click Configure... in AccountLinx.
- Enable the option to "Export to multiple QuickBooks companies."
Connect to QuickBooks Company File
To establish the initial connection between QuickBooks and SyncLinx/AccountLinx, you will need to set QuickBooks to single-user mode. After the connection between the applications is established, you can set QuickBooks back to multi-user mode.
- Log in to QuickBooks as an Administrator.
- Set the company file to Single-user mode by going to Files and clicking Switch to Single-user Mode.
- Open SyncLinx/AccountLinx.
- An Application Certificate window should appear in QuickBooks asking if SyncLinx/AccountLinx is allowed to connect to QuickBooks if this is the first time. If this prompt does not appear, make sure that SyncLinx/AccountLinx is set to import from/export to QuickBooks.
- Select the third option: "Yes, whenever this QuickBooks company file is open."
- Check the box for "Allow this application to access personal data such as Social Security Numbers and customer credit card information."
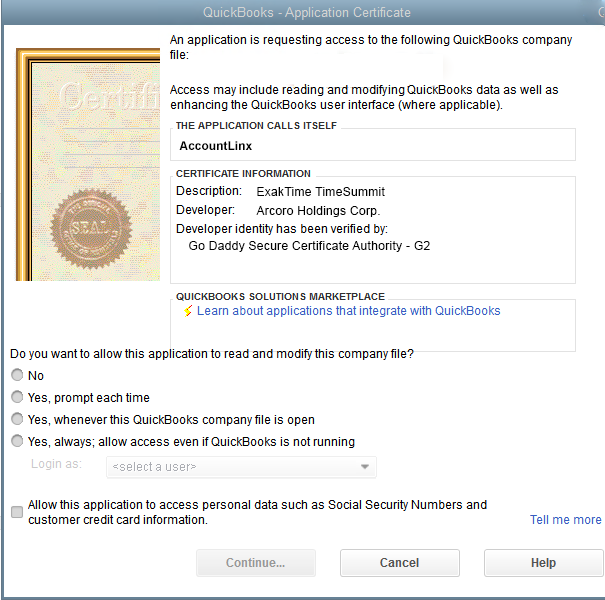
- Click and confirm the connection.
- Repeat this process for both SyncLinx/AccountLinx.
Re-Mapping for AccountLinx
Mapping is used to ensure that your ExakTime time data is properly associated with your QuickBooks entities (employees, customers/jobs, and service items). As the mappings are currently pointed to your previous QuickBooks company file, you will need to re-do the mappings to point to the entities of the new company file. Even if the entities have identical names, the underlying QuickBooks data is slightly different and will require you to re-map the data (i.e. John Doe exists in the old and new company file. While we would read them as being the same, the applications would see them as different entities which requires the data to be remapped.)
When you try to map with the new company file, you will receive a warning like the below:
"Opened QuickBooks company file does not match the company file previously used in AccountLinx. If you proceed, you may lose previously mapped data and settings."
This warning is intended to prevent you from mapping to the wrong company file, but if you are mapping to a new company file and will not be connecting to the old company file, then you can move forward with mapping your ExakTime Connect data to the new company file. We would still recommend enabling the option for "Export to multiple QuickBooks companies" anyway, just in case.
If you are going to be using both company files often or for a certain period, then the option for "Export to multiple QuickBooks companies" should be enabled to try to preserve the mappings between the company files as much as possible.
Overall Process for Switching with AccountLinx
If you are fully moving to a new company file and will not be using any other company file, the following information can be skipped. If you are switching between QuickBooks Company Files, refer to the steps below on how best to switch between Company Files for export.
After successfully connecting AccountLinx/SyncLinx to QuickBooks, you will need to follow a process to ensure your exports can be as smooth as possible.
- Open QuickBooks Company File A.
- Open AccountLinx.
- Perform any mappings for new entities and re-mappings for overlapping entities in AccountLinx for Company File A.
- Export time data from AccountLinx into QuickBooks Company File A.
- Close AccountLinx
- Open QuickBooks Company File B.
- Open AccountLinx
- Perform any mappings for new entities and re-mappings for overlapping entities in AccountLinx for Company File B.
- Export time data from AccountLinx into QuickBooks Company File B.
- Close AccountLinx.
- For the next set of exports, you should alternate the company files you are exporting to.
- For example, if the previous export was for Company File B, you should open Company File B first as your previous mappings are already completed. After exporting your time data to Company File B, you can start your process for exporting to Company File A. This will limit how much remapping needs to be done.